This guide is designed to walk you through the installation of Windows XP Home or Pro version. There have been hundreds of updates to Windows XP since its initial release eleven years ago, so we are going to cover all the steps to get you updated to today's current version. Relax and don't be intimidated. If you have a CD-Rom of your XP installation and a computer, you can do this!
In this guide we will cover the following:
-Installing the operating system
-Running your first System Updates
-Installing Internet Explorer 8
-Running Internet Explorer 8 for the first time.
-Enabling your Quick Launch
-Disabling Accessibility Controls
1) The ONLY hard step in this guide.
The only difficult portion of reinstalling your computer is the very first one, because it's different for different computers. Dell computers use a different key than HP computers, as does Toshiba, Sony, and the rest.
Whether you're installing a computer for the first time that you custom built or whether you're an average user just trying to reinstall your computer to save paying a computer company, the computer acts the very same. When a computer turns on it naturally is programmed to boot to its hard drive. Well, assuming your hard drive was damaged or isn't currently working properly, you can't boot that way so you need to boot to your Windows CD-Rom. How do I do that? It's simple enough really. We're going to put the disc in the computer, turn it on, and tell the computer to boot to a different device just this one time.
If the computer is turned on: Put your Windows XP CD in the CD-Rom drive and press and hold the power button until the computer turns all the way off.
If the computer is turned off: Press the power button to turn it on. Then immediately press the button to open your CD-Rom tray. Put the Windows XP CD-Rom in the tray and turn the computer back off.
Hint: If you press the power button and nothing happens, you're not holding it long enough. If you press and hold ANY computer's power button for 8 seconds, it will automatically cut the power and turn itself off.
2a) Turn the computer on by pressing the power button and watch for the Boot menu. (Dell)
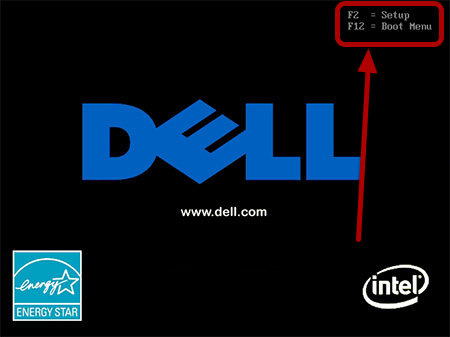
The above example shows a Dell computer's boot screen. Look for the text outlined in red above. To access the boot menu on a dell, you have to press F12. Once this black screen goes away its too late to press it. You need to press it while you're still seeing the Dell logo and this screen.
2b) Turn the computer on by pressing the power button and watch for the Boot menu. (HP Computers)

This example shows that you need to press F9 to access the boot menu, as opposed to the Dell above that says press F12.
Press the button that corresponds to whichever computer you have. If you don't have either an HP or a Dell, your first screen should tell you what button to push.
After you push the button you'll be taken to a screen similar to the following. (It may be a tiny bit different but the options will be the same)
3) Select the CD-Rom Drive

No matter what your screen looks like, it's going to be similar to the one above. Notice I used the arrow keys to select the CD-DVD Rom Drive. Then I press Enter to to go the next step.
HINT: Your computer may have more or less drives than the one shown in the example. Regardless how many you have, just choose the CD or DVD option. This will make the computer ignore the hard drive and go to the disc you inserted in step 1.
4) Press Any Key

You will usually see a screen like this. It's just asking you to confirm that you actually intended to boot using the CD-Rom drive. Press any key on the keyboard to verify and go to the next step.
5) Pre-Setup

The CD-Rom you inserted contains some code to tell the computer what to do next. At this point it's creating a temporary miniature space on your hard drive to allow you to continue. Notice the gray information bar at the bottom that says "Setup is loading...". Once this is done the screen will automatically change. You don't have to press anything here.
6) Getting ready to begin setup
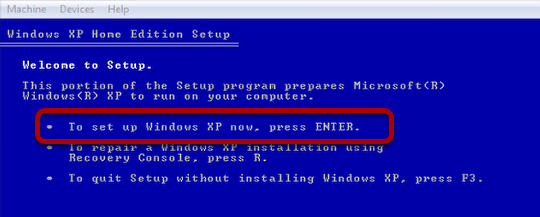
At this point you still haven't made any changes to your computer. Notice the blue box above says I'm working with Windows XP Home. Yours might say Windows XP Professional. Either way doesn't matter.
If you are ready to start installing your computer, follow the prompt above and press ENTER as instructed.
7) Press F8 to continue

This is just the screen that tells you your legal obligations about your computer. The status bar instructs you to press F8 to agree. Press F8 and go on to the next step.
8) Choose where to install the operating system.

95 times out of 100, you're going to just choose the highlighted option here. Basically the CD-Rom is looking at what's inside your computer and saying "Hi, where do you want me to put this Windows XP thingy I'm about to install? I happen to know that I have a 10 gigabyte hard drive in this computer, so I can tell that the highlighted option is correct. Yours will say something different, but just select the option that has the C: beside it. Use the UP or DOWN arrows to select the appropriate place to install Windows XP and then press Enter.
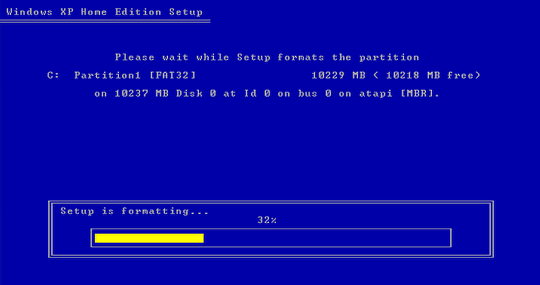
9) Format the drive.

Formatting the drive is like setting the table before dinner. Basically it wipes everything off the hard drive and prepares it to be given a new operating system. You can realistically choose any of these options above, but I always choose the option you see above titled "Format the partition using the NTFS file system." Press Enter to continue. This process will take anywhere from 5 minutes to 1 hour depending on your computer and how big your hard drive is.
Useless trivia
Older operating systems such as WIndows 95 and 98 used the Fat32 file system. It's an older type of filing structure. The basic reasons to choose NFTS are because:
-FAT32 Drives get slower as they get more full of information,
-FAT32 Drives don't support encryption of your data.
-Fat32 drives can't read any hard drive over 137 gigabytes. Most hard drives today are a minimum of 250 to 500, with 1000-2000 GB drives being very common for less than a hundred bucks.
-If you choose option2, NFTS with "Quick" the computer doesn't scan the hard drive for bad sectors. Consider your hard drive like an old Vinyl record.. that's actually exactly what it looks like. The option we've highlighted above goes through and examines each and every groove in the record and makes sure it's in good shape with no scratches or defects. If it finds a defect, it marks it and remembers not to use that spot on the drive.
12) Are you sure?

You just told the computer to format that drive. Format means Wipe EVERYTHING off there so I can start from scratch. This means if you had any pictures or documents on the hard drive before, they will be erased completely. Normally this is what you want if you're performing this step anyway, so just press F to continue.
13) Wait for it to finish.

As we told you a few steps back, this might take 5 minutes or it might take an hour. You don't need to do anything here.
14) Keep waiting and watching
Just keep an eye on the progress indicator. Don't worry if it appears to stay on the same percentage for a few moments. If it gets hung on any percentage for more than 30 minutes there's something wrong and you need to start over with step 1.
Likely problems could be:
-A scratch on your CD-Rom
-A damaged sector on your hard drive that the program can't access, but it doesn't know that.
-Another hardware problem we can't determine from here.
15) Format Done. Still Waiting.

OK the format is done and now the program has gone on to start the install process. Your hard drive is empty, so it's going to take a few minutes to copy all the necessary programming from the CD to your computer's hard drive. The grey status indicator will keep you informed about what's going on.
16) Copying Files. Still waiting.

Now you see another progress indicator informing you that the process to copy the files over has begun. Just hang out and wait. This part usually takes from 5 to 10 minutes.
17) Reboot
Once completed, your computer will reboot automatically and begin the actual installation using the new files it's copied to your hard drive. You do NOT need to press any keys or do anything to assist at this point. In fact, go make a hot-pocket and have a cup of coffee. You're probably already stressed out enough as it is. Watching this screen won't make it go any faster. :)
18) Installation Truly Begins.

Once all the files are copied over to your hard drive, your computer no longer needs the CD-Rom. You can leave it in the tray, but you'll be working from your new drive from this point on.
19) Tell the computer where you are and what language you speak.

Now you have the option to change some defaults. You probably won't want to, but if you wanted to change your language from English to Spanish, or your currency from Dollars to Rubles, you would press the Customize button. Since we're assuming you are english-speaking and live in the United States, we're gonna skip all that and just press Next.
20) Tell the computer who you are.

This isn't the part where you choose your username. This is the part where you tell the computer who it belongs to and what company owns it. After you set this here, the computer will always use this value as the default to register new software in the future.
21) Enter your own information

We are going to say our user is John Doe and he works for a place called "My Company." You enter whatever details you wish here and press Next.
22) Enter your COA

Each copy of Windows sold comes with a COA. Basically it's a sticker with a 25 digit code made of numbers and letters. If you bought your Windows XP disc from a store, this sticker will be on the sleeve the CD was in. If you bought a Dell or HP or other branded model computer, the sticker will have been peeled off and affixed to your computer somewhere, usually on the side or back. If it's a laptop or netbook, the sticker is on the back.
Enter your code and press Next.
Note:
-You don't need to press any keys to change fields. As you type the 5th character the cursor will automatically jump to the next box.
-The COA is NOT case sensitive, so you can use either upper or lowe case letters.
- You do NOT have to enter your COA now if you can't find it. You will be allowed to run Windows for 30 days, during which time the computer will prompt you every so often to enter it. If you don't have it after that time, it won't work at all anymore.
23) Name your Computer

Believe it or not, this actually IS an important step,especially if you plan to have networked computers in your home where you share files back and forth. Your computer name can be 15 characters long, can NOT contain spaces or other characters, just numbers and letters.
A good computer name would be something like JohnDesktop or SallyLaptop or if you only have one computer in the house just put Desktop.
Once you're done, press Next.
23b) Example

Since our pretend user only has this one computer, we chose to call it simply "Desktop"
Why:
If you had a home network (meaning more than 1 computer in your house) you can share files together. To do that you usually type a command like "\\Desktop". I can remember my computer is called Desktop, but if I'd used the sample default I'd have to remember that my computer network command is "\\MY-E0606822EEA6".. which I'd never remember.
24) Set your time zone and verify your clock is set right.

It's important to be sure this information is correct for a bunch of technical reasons I won't go into here, but it's simple to verify. You will note that ALL computers come defaulted to GMT-8 Pacific time. Why is that when you might live on the east coast? Well, because Microsoft made the operating system and they're located in Washington state, which is... you guessed it; Pacific Time. Press the Down Arrow to select your time zone and press Next.
25) Now you can go take another break.
Your computer now has enough information to continue setting up on its own for a few minutes. You can take a break while the installation continues for a bit.
26) Setup your Internet and Network

If your computer is on a wired network, be sure it's already plugged in. If it is, Windows can setup the internet now for you instead of being an aggravation later on. If you're on wireless, you can still most likely perform this step if you can plug into your wireless router. (Yes, it has plugs on the back to do wired AND wireless setup.) This guide assumes you DO have internet access, but if you don't you can still follow through on the setup. You just can't complete the other functions listed later on. However, you can still get the computer up and running just fine without internet access.
The screen here shows you the default option of "Typical Settings." Most of you will just press Next here. If you want to customize your setting, the next screen shows you what it would look like.
26b) Custom Internet Settings

If you chose Custom Settings at the previous screen, this is what you would see next. Assuming you are a home user on a basic cable or DSL or Wireless internet package, you won't need to customize anything here. However if you're running WIndows XP Professional in an office environment with a domain controller, you would enter your IP information here. However, if you're on a domain controller (another computer that controls your computer) you probably have an in-house IT guy anyway and you're gonna be in BIG trouble for doing this on your own! lol.
27) Wait Some More

Once you pressed Next on the internet setting step your computer will resume its final steps of the installation. You can wait while it completes as there's nothing to do yet.
28 )Video Settings

The computer has now just started its custom configuration, the part where it customizes things to your particular computer. At this point it has probed through your system to determine what kind of monitor you have, what kind of video card you have, what kind of cables you've got connected, and is now going to adjust itself to what it believes is your optimal viewing experience. Just press OK (or hit Enter) to see the effect.
29) Confirm Video Settings

This is the video confirmation screen. Your computer has decided that based on your hardware, this is how the screen looks best. If it looks fine to you, just press OK.
If you are not able to see this screen:
-Don't panic. The screen will change back to what it was like before after 30 seconds. If you haven't pressed anything the computer assumes there must be a problem and you can't see the box correctly enough to read it, so it switches back.
-If your screen text appears REALLY BIG don't fret. Apparently your Windows disc either can't recognize your video card properly or can't recognize your monitor properly. Either way you will be able to correct this setting later on once you're up and running.
30) First Real Boot

The next step you should see is the Windows XP Logo. This means your computer has now copied everything over to your hard drive from the CD-Rom, has gotten all the information it needs to be able to program itself, and it's about to start that process next.
31) Press Next

This is just the welcome message. Press next to start customizing your new Windows XP computer.
HINT:
-Anytime you see a letter underlined, like the "N" in the word Next on this example, that's telling you that you don't need to use the mouse to click it if you don't want to. You can simply press the letter on the keyboard that corresponds to the highlight and it will perform the command for you. Try it by just pressing N instead of pressing it with your mouse.
32) Press Next (if you see this screen)

Depending on your version of Windows you might or might not see this screen. I created this demo using Windows XP version N, meaning there isn't any media player software preinstalled. You most likely won't have a screen like this, but if you do, just press Next to continue.
33) Setup Automatic Updates

Notice the Next box is grayed out now. You can't proceed until you choose either YES, or NO to turning on Automatic Updates.
What are Automatic Updates:
Windows XP was released for sale to the public in stores for the first time on October 25th, 2001. In the ten years since it came out there have literally been THOUSANDS of updates made by Microsoft, some of them minor updates, and other more major updates. The Major updates are often bundled together and called Service Packs. These updates are indeed important to protect your computer for a couple reasons.
Some of those are:
-Someone discovered a bug in 2002, so microsoft wrote an update to fix the bug. If you don't get the updates your computer will always be susceptible to that particular bug. (often called Exploits, or security holes in the system)
-Something major has changed in the way people need to use computers. The internet is changing daily and since most users rely on the internet, certain updates need to be made to make sure you can continue to use all the features offered by some web sites.
-Software compatibility. Let's use an example: Intuit, the makers of Quickbooks, are using a new technology invented in 2008. Your computer's programming was invented in 2001. Quickbooks can either NOT use the new technology, which makes their program run better and faster and makes it easier to use, OR they can ask Microsoft to make a change so that older XP computers can utilize the new Quickbooks.
This happens almost weekly in the modern world. There are hundreds of updates each year and if you don't have them, your computer won't be able to do the things others can. So, in short, it is my recommendation that you check the top option above, then press next.
34) Checking your Internet Connectivity

Since we already told the computer in Step 26 that it could go on the Internet, it's going to go online on it's own real quick and check in with Microsoft to see if there's anything important it needs to know. You can Skip this step by pressing Skip, but it only takes 1 minute so you can just wait for it to complete and press Next.
35) How are you connected?

What to press here:
If you are NOT on the Internet at all, press SKIP.
If you are connected to a wireless router, or are part of a home network, Select YES above then press Next. (This is the normal option for most people)
If you are DIRECTLY CONNECTED to internet (and you're probably not) then select NO and press Next t continue.
36) Activate Windows

Activating Windows is a required step, so you might as well do it now if you're connected to the Internet. Just choose the "Yes, Activate Windows over the Internet now" option and press Next. If you aren't connected to the Internet, you can just choose "No, remind me every few days" and then press Next.
Reminder: You will only be able to use the computer for 30 days before you absolutely have to Activate. Otherwise Microsoft assumes you are using a stolen copy of Windows XP and will prevent you from being able to use it until you either activate or purchase a new copy.
37) Register with Microsoft

I personally always skip this step. Basically this just gives them your name and email address and tells them that you own a copy of their software, which means they'll email you from to time. I already get enough email without the extra. Choose either preference on the menu above and press Next.
38) Create your Account

This is to tell the computer who you are. Whatever name(s) you put in here will be the usernames for the computer. If there's just one of you, simply enter your name in the first box and press Next.
If you want each of your family members to have an account, you can enter all the names in your family and they can each have a user account, their own documents, their own pictures, their own favorites, etc.
Your preference here depends on your needs and your personal desires for privacy. If you all share one account, then your browsing histories, documents, and photos are shared, which you might or might not consider a good thing.
38b) Keep it Simple

Avoid complicated or long usernames. You can use your name, like the example above, or you can use something like "Mom, Dad, or Family" as the username. Just try to avoid a lot of special characters. Keep it simple. There are security reasons for this, but that's a subject for another how-to on another day.
Enter your name(s) and press Next.
39) Thank You!

Ok, this is the last step before you start using the computer. Press Finish to close out the install wizard and begin using your computer.
40) Welcome to Windows

You should now see this screen while your computer loads up for the first time.
Hint: If you don't see this screen, remove the CD from your tray and restart again.
41) You're In

Now we can see your desktop and we're in business. You CAN stop here if you'd like, but if you're connected to the Internet there are a few more steps you might want help with. Read on for more details.
42) Let's Get Updated

Remember, it's at least December of 2010 if you're reading this and your computer is running on programming from October of 2001. How about we get some updates going and get your computer caught up to speed.
You have to be connected to the internet for this part to work.
Press Start
Press All Programs
Press Windows Update (at the top of the menu) to get started.
43) Getting Ready to Update
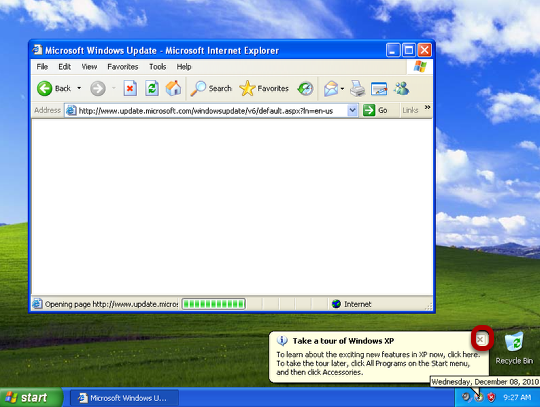
See that annoying little "Take a tour of Windows XP" box on the bottom right of your screen? That's going to pop up every single time you start the computer if you don't click that little X in the corner. Click it now and let's go on.
If you're connected to the Internet, your computer will automatically launch Internet Explorer when you press Windows Update and will go to http://www.update.microsoft.com
44) What kind of updates do you want?

This screen might confuse you, but don't sweat it. If you're the technical geeky type you might want to press "Custom" to choose what updates to install. If you're a normal user you can just press "Express" and the web site will automatically give you the important updates you definitely NEED and leave out some of the optional stuff you don't necessarily want.
Use your mouse and click the "Express" button to continue.
45) Checking for updates

Your computer literally already has over 500 programs pre-installed, even though most of them aren't ones you can use. Most of them are system programs or drivers for some of your hardware. This screen tells you the web site is taking an inventory of what you already have, then comparing it to the list of updated things it knows about that you might need.
46) Security Warning

The first time you ever use the Internet to send data (like you're doing now) you will be greeted with this prompt. It just warns you "when you send informaiton to the internet, it might be possible for others to see that information. Do you want to continue?" Press "YES" and go on. You can't possibly use the internet AT ALL without sending data. Otherwise it would be the AloneNet, not the Internet.
if you don't see the warning here it just means you've already done some web browsing and you had to click it some other time before you got to this step. No worries.
47) Updating the Windows Updater

Yep, you read that title right.. even the updater needs to be updated. A few years ago Microsoft changed their update program to a nicer and more stable version. You'll to replace the updater on your computer with the new one before you can actually get the updates. Press the "Download and Install Now" button to continue.
48) Your first update. What is Windows Genuine Advantage Validation?

You'll notice here, and this is purely for informational purposes, not part of the info you need to know, there are two updates going on. The first is called Windows Genuine Advantage. The second is the update for the windows updater you just chose on the previous step. This is where Microsoft got sneaky! Just wait until this screen goes away and then you can continue.
What is the Windows Genuine Advantage Validation Tool?
In November of 2005 (four years after the release of Windows XP) Microsoft had finally had enough of people stealing their software without paying for it. Hacked versions of windows were everywhere on the Internet, freely available for anyone who knew how to download them. After losing hundreds of millions of dollars in lost sales revenue, they implemented WGA (or Windows Genuine Advantage). Has a nice name doesn't it? Well, it's actually quite a nice package for a nasty little trick. This little program is the reason you have to "Activate" Windows now online. You didn't used to have to do that.
If you want to read the official report of what WGA is, you can do so here.
The short answer is:
As a solution to stop counterfeit copies of Windows XP, Vista, 7, and Office from being distributed on the Internet, Microsoft created WGA. Basically it looks at your hard drive, your motherboard, your memory, your processor, and your serial key (that 25 digit code you entered earlier in this tutorial) and it generates a really long complicated unique fingerprint for your computer.
Here is an example of a WGA Activation String that your computer sends to Microsoft when it creates your unique fingerprint.
<GenuineResults><MachineData><UGUID>{63FD543D-B32E-4905-AB46-178942722DEC}</UGUID><Version>1.9.0027.0</Version><OS>5.1.2600.2.00010300.2.0.hom</OS><Architecture>x32</Architecture><PKey>*****-*****-*****-*****-4C8MT</PKey><PID>76477-OEM-2111907-00102</PID><PIDType>2</PIDType><SID>S-1-5-21-725345543-606747145-682003330</SID><SYSTEM><Manufacturer>XFX68L</Manufacturer><Model>XFX Nforce 680i LT</Model></SYSTEM><BIOS><Manufacturer>Phoenix Technologies, LTD</Manufacturer><Version>6.00 PG</Version><SMBIOSVersion major="2" minor="4"/><Date>20080122000000.000000+000</Date><SLPBIOS>Dell System,Dell Computer,Dell System,Dell System</SLPBIOS></BIOS><HWID>E81233870184807A</HWID><UserLCID>0409</UserLCID><SystemLCID>0409</SystemLCID><TimeZone>GMT Standard Time(GMT+00:00)</TimeZone><iJoin>0</iJoin><SBID><stat>3</stat><msppid></msppid><name></name><model></model></SBID><OEM/><GANotification/></MachineData><Software><Office><Result>109</Result><Products/><Applications/></Office></Software></GenuineResults>
Once you have run WGA for the first time, or activated your computer, microsoft now keeps that string of code in a digital vault. If another person tried to use your copy of Windows on another computer, it would already have your key and your fingerprint. It would compare the serial number of that person's key to your key and know it was already installed on another computer, so that second person couldn't Activate. This means they either have to stop using Windows or have to purchase their own copy from Microsoft.
Do I HAVE to have WGA?
Yes. Even if you chose not to install it now, it would bug you every time you ran an update for the rest of your life. And as soon as you tried to install Service Pack2, or Service Pack 3, or Office, or Windows Live, it would require WGA to run any of these anyway. Basically, if you're not willing to prove you have a valid licensed copy, they're going to stop allowing you to use the computer until you prove it to them.
So, in short, if you're running a copy of windows off a CD-ROM that's written with a sharpie on a burned disc.. be careful. The fine if you're caught can be as high as $20,000.00 per violation. In comparison it seems pretty easy to just purchase a valid license for less than a hundred dollars from Microsoft.
Ok.. back to your install now...
49) Back to Updating
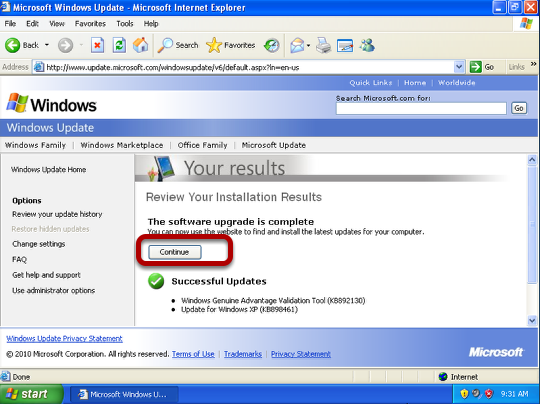
Ok, now that you've updated your updater, you can continue and actually get the updates you need. Press the Continue button on your screen.
50) Select the Updates and Install Them

Since you chose Express back on Step 44, these are the updates Microsoft has said this computer needs. You can scroll through them and read details or you can just press Install Updates.
51) Updates that require acceptance.

Some of the updates you're going to install will require you to accept the new terms of the agreement. You already did this WAY BACK on Step 7, but those were written back in 2001. This particular one you're seeing here is for an update released on November 2010. Just press I Accept and it will continue with the download.
52) Wait Some More

You can see from my progress screen that I'm currently downloading update 7 of a total of 74. Once this is finished the program will say "Installing " instead of "Downloading" another 74 times. Your computer will not necessarily have the same number of updates that mine does. Some will have more, some will have less, depending on how old your Windows XP CD-Rom was.
53) Repeat the Process

Some updates are going to require you to restart your computer. If they do, you'll see an option to "Restart Now." Press the Restart Now button and the computer will reboot.
Once it has rebooted, I suggest you continue this step of pressing Start, All Programs, Windows Update and choosing "Express" from the on-screen menu until there are no more updates to install.
Why:
Example: (I'm going to use fictional numbers here) In 2005 they released Update Number 123456. Well in 2006 they realized that caused a problem and so they released updates ABC, 123, and DEF. Well you don't need those updates unless you already have update 123456, so the computer won't know to give you those updates until you have already installed 123456 and then checked for updates again.
This means you might download 74 updates the first time, then 5 the next time, then 247 the third time, etc. Eventually you will have ALL the possible updates to your computer and THEN you can start installing software and be confident that you're as updated as you can possibly be.
54) Internet Explorer 8

One the express downloads you're going to get is a newer version of Internet Explorer 8. If you just installed your computer, you had Internet Explorer 7. The newer version is more stable, uses less resources, and has some custom options you can choose. At some point in time during your Windows Update experience you will see this screen above. Check the box beside "I want to help" or "I do not want to participate" and then press "Install to confirm that you want to update to Internet Explorer 8.
55) Accept the Terms for Internet Explorer 8

Just like in Steps 7 and 51, this program too has new terms you have to accept before you are allowed to install it. You can choose to read them if you want, or not. Just press I Accept to continue.
56) To Update or Not to Update

I'm not even sure why they bothered to give us users the option for this, but you have the option either have Internet Explorer automatically update itself, or not. The default is to install updates. Just keep the box checked and press Next.
57) Finishing Internet Explorer 8 Setup

Once you've pressed next, you can sit back a few minutes while it downloads the updated files from the Microsoft servers. This should take between 1 to 5 minutes depending on the speed of your computer.
58) Resuming Updates

Once Internet Explorer has completed it's update, you will resume installing the other updates. This process is automated so you don't need to press anything at this time either.
59) Restarting After Updates

You will notice this screen throughout the life of your computer. Sometimes after you perform updates you will have to restart. Other times you won't. It depends on whether the update involved working with files the system is currently using. For example you computer can't delete Internet Explorer 7 and replace it with Internet Explorer 8 while you're still using version 7. So it therefore prompts you to restart so it can complete the update process after it reboots. Whenever you see this screen you CAN choose Close and just restart later, however I do not suggest running anymore updates until you have restarted the computer. Refer back to the hint on Step 53 to find out why this is if you're curious.
Press Restart Now to Continue.
60) The restarting process.
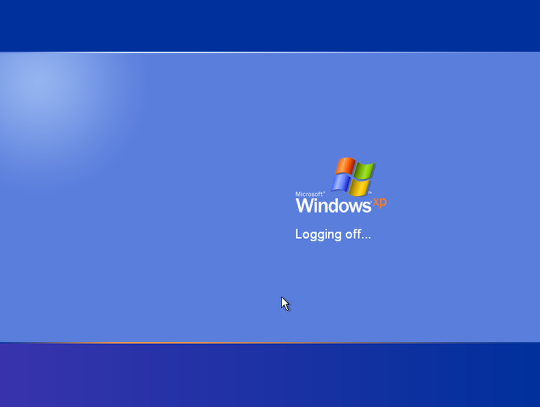
I'm only mentioning this for those that might have an error here. Once you've pressed Restart Now the computer will close all your open programs and then you will see two screens. This is the first screen, notifying you it is logging off your user account. You don't need to press anything here. Just watch and wait until it comes back up.
61) The "actual" shutdown

This message informs you all programs are closed, all users are logged off, and the computer is shutting all the way down. Nothing you can press on keyboard has any affect at this point, so just wait a couple more seconds and the computer will restart on its own.
Remember, after the computer restarts, press Start, All Programs, Windows Update to be sure there are NO MORE updates left you can possibly run. Once you've run them all, you can refer to the next step for a few small system tweaks if you choose.
62) Using Internet Explorer 8 for the first time
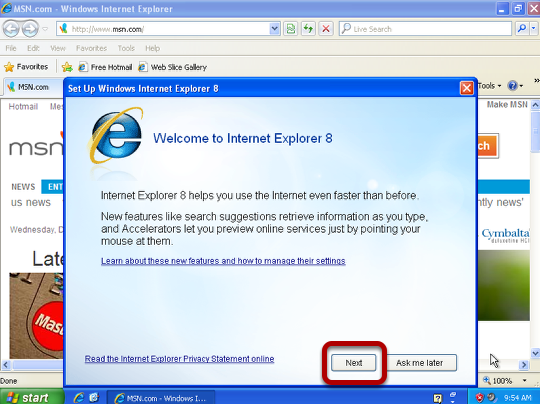
Once you have installed Internet Explorer 8, you should be checking for more updates, right?
The next time you open your Internet browser you will be greeted with a first time setup screen. For some reason people keep pressing "Ask Me Later" and I don't know why. This screen is going to come up every single time you launch Internet Explorer 8 until you finally go through the wizard. It's easy so just follow along with the next few steps. Press "Next"to begin.
63) Customizing Internet Explorer 8

Let me give you a tiny bit of history. Microsoft Internet Explorer 7 was the worst browser they ever invented. Compared to others it was clunky, slow, bloated, and performed poorly next to rivals such as Google Chrome and Mozilla Firefox. After awhile Microsoft was starting to really lose Internet Explorer users because people started using free competitors (such as Chrome and Firefox) instead of the browser that came with their computer.
It should be stated clearly that the author of this post most definitely prefers NOT to use Internet Explorer 8 compared to using Google Chrome, but there are certain sites on the web that you absolutely can not view without Internet Explorer, so you might as well have it tuned up and running right.
These next few instructions are designed to make Internet Explorer 8 run at it's fastest and with the least amount of power and processor required. Feel free to choose settings different than we have chosen here. This part of the tutorial is merely our opinion provided to you if you want the extra advice.
Suggested Sites:
Suggested sites is just what it sounds like. Based on the sites you visit and the history in your browser, Microsoft will suggest sites you think they might like. My personal preference is to check the box beside "No, Don't Turn On" and then press next.
64) Choose Your Settings
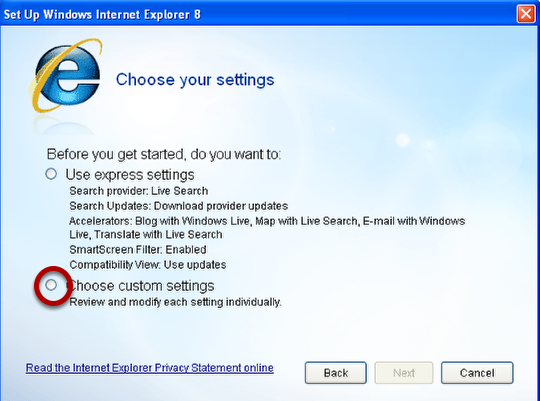
Internet Explorer likes to use Microsoft services for everything whenever given the option, and we personally don't want all that extra junk added to our browser, so we're going to suggest choosing "Choose Custom Settings" and then Press Next.
65) Choosing your default search provider

This tells us our default search engine is Live Search. I prefer to use Google.com for my searches, so I'm going to choose the second option and press Next.
If you want to change your default search engine to AOL, Yahoo, or another service, choose the same thing we did and follow on. You will just choose your personal preference when we get to that step.
66) Search Provider Updates

There are some impressive things happening with the search providers right now and if you're the kind to have an interest in that (like we are) choose "Yes, I want to download updates" and anytime there is a change to your search provider's technology, the update will automatically be available to you without any work on your part. Choose your preference either way and press Next.
67) Accelerators

These offer some neat features but it's like driving your car with the air conditioning on at full power, the headlights on, wipers on, while driving uphill pulling a house... it just takes too much power away from the car. The same is true with the internet browser. Internet Explorer is already "heavy" compared to the other lightweight faster browsers, so we're definitely not going to weigh it down with more stuff. We chose Turn off all Accelerators that are included with Internet Explorer. Make your own personal choice and press Next.
68) Smart Screen Filter

This is like a basic low-grade antivirus and malware tool for your browser. It allows your computer to check the validity of some web sites against a database kept by Microsoft containing a list of BAD sites. So, it helps you surf more safely. I'd say it's worth keeping for our purposes. Make your selection and press Next.
69) Compatibility Settings

Some websites don't take advantage of the new coding technologies out there. Therefore some older sites might not look right to a fancy new browser like Internet Explorer 8. Compatibility view lets you see these sites the way they were intended. We've personally had quite a few web sites that make use of this feature so I'd definitely turn it on. Then press Finish.
70) Adding that Search Provider we talked about earlier

Now that you've finished up with your settings, it's time to go change that default search provider like we mentioned earlier. Internet Explorer 8 has been kind enough to already open the page for us, but it's behind a tab so you can't see it yet.
Tabs: Internet Explorer uses tabs to allow you to view multiple web sites within the same screen. It's a really great feature if you like to open three or four sites at once and refer back and forth. Here's how you use tabs:
71) Closing out a tab.

The red box indicates tabs above. You see in our example there are three tabs open. We really don't care about this page that's currently open, so you can close this individual tab by pressing the SMALL X inside the small red highlighted portion. Pressing the big red X in the upper right of the page will close ALL your pages, rather than just the tab you're looking at.
72) Adding your search provider.

You can see we only have two tabs open now, one of which is the screen where we choose the search provider we want. We clicked on Google and the following box pops up on-screen.
72b) Continued

If you look closer, we've checked the option to make this our default search tab, as well as the Use Search suggestions from this provider. Once you check both boxes on your preferred search engine, press Add.
73) Search Provider Changed to Google (or your preference)

How do you know it's changed? Look in the upper right side of your browser. The area is highlighted in red above in the example. Notice the search provider box now says Google instead of Live Search (see step 72 for an example of how it looked before).
Now, rather than having to go to Google.com and THEN searching the web. We can just type what we want to search for in this box at any time and it will perform a Google Search for us.
You can set this box to search any number of search providers by pressing the small arrow our red arrow points to and choosing "Find more providers..." from the drop-down menu that appears.
74) Closing out of Internet Explorer

Well, we're done here on this section and we're ready to close the window. Out of habit we always click the big red X in the top corner. Internet Explorer is smart enough to ask us "Hey, do you really want to close ALL your open tabs, or just the one you're looking at?" You will only see this message when you have more than 1 tab open at a time. Press Close All Tabs to close Internet Explorer Completely.
75) Enabling Quick launch

Quick Launch is a feature already turned on in all Windows Vista and Windows 7 computers, but it's not turned on by default in Windows XP. It has been our experience that it's a very useful place to store icons for our most commonly used programs.
How to turn it on:
Pay close attention to where my mouse is located in the example above. Put your mouse over the task bar (that blue bar at the bottom of you screen) and be sure not to put it over an area that's filled by a program. Just pick an empty spot on the blue bar.
RIGHT-CLICK the mouse (not left click)
75b) Continued

Once you right-click, you will see this menu. Slide your mouse UP to where it says Toolbars, then slide right and down and LEFT CLICK on Quick Launch. Use the screenshot above to see where it's at if you're having trouble.
76) Done

See the two new icons that appeared? Now you can quickly open Internet Explorer or go back to your desktop without having to resort to all the mouse clicks it usually takes to accomplish the same task. You can drag any number of Icons from your desktop to this area to put your favorite programs on the Quick Launch.
Example of our Quick Launch Area

You can see in the example above that I keep about 6 programs in my Quick Launch. These are programs or features I use daily so I keep there for quick reference.
You are done!
Yup. That's it. If you've followed along all this way, you've done absolutely great.
If you'd like to suggest improvements to this walk through, or if you find mistakes, or typos, or think something needs clarification, post a comment below and we'll get back with you about your request. We really hope you've enjoyed the material and that you've found it helpful!
No comments:
Post a Comment
Thanks for taking a moment to leave a comment! Please keep the language clean. (If you are considering spamming the blog, don't bother. It's going to be deleted anyway.)