Information You Will Need
Before configuring Microsoft Outlook with your new email account information there is some information you will need to have acquired from your service provider or administrator. YOU WILL NEED ALL OF THE INFORMATION I'M ABOUT TO SHARE WITH YOU so here are the questions to ask (and how to ask them) to be sure you only have to do this once! There is nothing more frustrating to a computer user than getting halfway through your email setup and then finding out you have to start all over again because you dont have all the information you need.
Call your provider or web host and ask them these questions. Write the answers down on a piece of paper and have it handy when you get ready to setup Outlook.
1) What is my email address?
2) What kind of mail server do I have? POP3 or IMAP?
3) I'm going to be using Microsoft Outlook. What is my account username?
4) What is the name of my incoming mail server?
5) What is the name of my outgoing mail server?
6) Does my outgoing server require authentication?
If the answer is YES, the ask "Can I use the same settings as my incoming mail server?" Chances are they will tell you "Yes" but if not, make a note of what those settings are.
7) What is the Outgoing send mail port I need to use?
This is all the information you will need to know to configure your account.
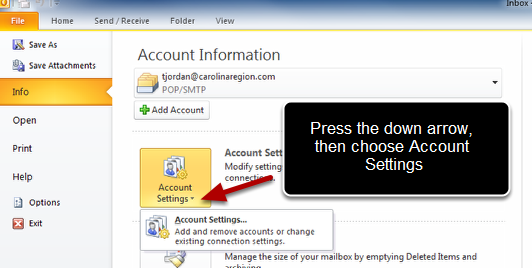
Open Microsoft Outlook and Choose "File" from the main menu
Adding the account
Be sure you have chosen "Indo" from the dropdown ribbon on the Outlook taskbar. Then press "Add Account" on the right.
Selecting Manual Account Setup
The new Outlook 2010 defaults to automatically select your server settings, which normally works fine if you have a @gmail.com, @yahoo.com, or @hotmail.com email address. Assuming you have your own custom domain name however, you will need to choose perform a manual configuration of your email account. Be sure to select "Manually configure server settings or additional server types" and press "Next."
Choose your Service Type
"Internet E-Mail" is the default service type and is what you will want to select. Leave the settings as they are and press "Next" to continue.
Entering your Internet Email Settings - Instructions

This where you enter your main settings for your email account. You will need information from your provider. I will go over the fields in this step and show you the example material in the next step.
1) Enter your Name. This is the name that will appear in the "From" field when you email people, so it's normal to just use your full name.
2) Your email address: This is your full email address which will be something like username@mydomain.com
3) Your server type is important. Most accounts can use either POP3 or IMAP but the settings are different for each one. For this example, we will be setting up the most common account type: a POP3 email account.
4) This is the server (or computer) where all your mail is held for you on the internet. Think of this as the post office you go to when you want to pick up your mail.
5) This the server (or computer) where all your outgoing email goes to be sent. Think of this as your local postmaster, where all mail is delivered by truck and sorted to go out.
6) Your username is most commonly your full email address. For example if your email address is johndoe@mycompany.com, your username is either "johndoe" or "johndoe@mycompany.com". Your administrator should have this information available for you.
7) Your password is unique to you. It is uncommon for most email providers to be able to tell you what your password is. If you lose it, you'll need to reset your password through your providers lost password process. So, be sure you choose something you can remember, but try not to make it TOO EASY! Use common tricks like this: If my password is my cat's name "shannon" they maybe I'd choose "$h@nn0n" as my password. The special characters make it unlikely a password cracker will get your password but the moniker makes it easy to remember. I would definitely NOT suggest making your email password the same as any other password you use. It is VERY COMMON for people to crack email passwords, and since all your online accounts are linked to your email, one person with your email password would likely have quick access to all your other accounts. Keep this password unique.
8) You can choose to "remember password" so you don't have to type it each time you open your email. If you uncheck this box, you will have to type your password every time you open Outlook to check your email.
9) Don't check Require login using Secure Password Authentication (SPA) unless you are specifically told to do so. This setting is uncommon for most pop email accounts and is often confused with another setting you'll see later.
10) Even though it looks like you're almost done on this screen we're not. Press "More Settings" to access the advanced properties of your email account.
10) Once you have everything entered correctly, press "Next".
Entering your Internet Email Settings - Sample Data
Enter the settings mentioned in the step previously and then press "More settings". Do not press "Next" yet.
More Settings - Outgoing Server
Click on the Outgoing Server tab and then check the box beside "My outgoing server (SMTP) requires authentication. The default is then set to "Use same settings as my incoming mail server". You can leave this setting as is.
More Settings - Advanced

Next, press the Advanced Tab, and make note of the following settings.
Outgoing Server: Your email server probably uses a different port to prevent SPAM being sent from your account. The two most common alternate ports for outgoing mail are 2525 and 587. Check with your provider to see what your outgoing port number is.
Leaving a copy of messages on the server: This can be a useful feature. If you wish to check your email from another device such as another computer, mobile phone, or webmail, you might want to leave your email on the server for a couple of days after you check it. This is basically similar to going to the post office to read your mail, opening it all and reading it at the post office, then shoving it back inside the mail box because you plan to send someone else back later to get it (someone being your other computer or mobile phone). If you choose to do this, then choose a decent time to remove the read emails from the server. Anywhere from 10 to 14 days is normal though you can choose less or more to suit your taste.
Once you've adjusted these settings, press OK.
Testing Your Account Settings
Once you press "OK" you will be returned to your account settings screen. Here you can press "test account settings" to verify you have setup everything correctly. Outlook will then attempt to send a test email from your account to your same account to verify it can login and send and receive email properly.
Testing Account Settings
This is what your test will look like. When it's done it will either complete successfully or report an error.
Incorrect Settings
If you made a mistake entering your settings, you will see a screen like this one here. You need to check your settings you entered again to be sure they are correct. You've made a typo somewhere in your settings. In this particular error, you can see I entered the mail server incorrectly. Press "Close" and you will be returned to the account settings screen where you can correct your mistake.
Correct Settings
If your settings were correct, you will see "Completed" next to each of the two tests. Now you can press Close to be returned to the Account Setting screen.
Press Next
Since you have successfully tested your account settings, you can now press "Next" to go on.
Finished.
Once you press Next, you'll be greeted with this screen. Now you can press"Finish" and be returned to Microsoft Outlook and your new email account should be working properly.